Published: 2015-05-26
Document version: 1.3
- Content Studio version 5.2 and later, version 5.7 is recommended
Description and installation instructions
Disclaimer
Content Studio version 5.7 introduced several new improvements to VSI and some of the actions and features described in this article require at least Content Studio 5.7.
What is Content Studio VSI
The Visual Studio Integration software, or VSI, is an implementation of the Source Control API provided by Microsoft that can be used to integrate source code control management into their products. This allows Visual Studio to open a Content Studio web site remotely, storing it locally, work with the site locally and eventually save or publish documents back to Content Studio.
How does it work?
VSI integrates into Visual Studio as an installed package and handles the normal source control commands e.g. check-in, check-out and get latest. Once a supported command is identified, VSI communicates over TCP-IP to the relevant Content Studio public API to fetch data from the actual Content Studio Web site.
System requirements
Client
- Visual Studio 2010 and later. Express editions are not supported.
Server side
- Content Studio 5.2 and later. However Content Studio 5.7 is highly recommended.
- The network firewall must allow the Content Studio TCP-IP port to be open for traffic - default port is 9792.
Installation
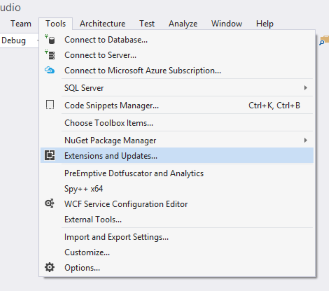
Content Studio VSI can be installed directly from Visual Studio using the Extensions and updates... command under the Tools menu.
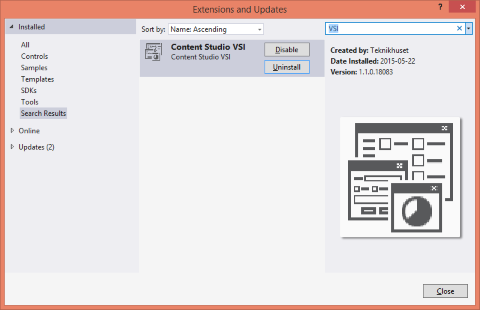
By selecting the Extensions and updates... menu alternative
the Extensions and updates window appears. Search for VSI and
Content Studio VSI should turn up in the search result and can be installed
from here. Also, any update to VSI will turn up under the Updates alternative.
As an alternative VSI can be downloaded from
Visual Studio Gallery.
Using VSI
Before you start
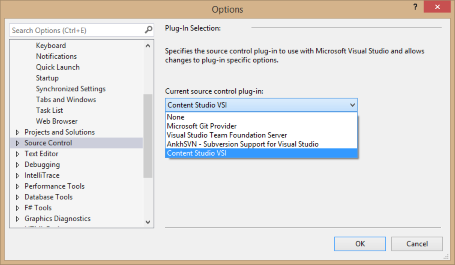
When VSI has been installed, but before any project (web site) has been opened, Content Studio VSI must be selected as the Visual Studio Source code control plug-in. This is done with the Tools/Options... menu command which brings up the Options dialog. By selecting the Source Control command, all installed Source Control plug-ins are listed and one of them can be activated. Visual Studio does not "remember" which Source Control plug-in is used with a specific project. Thus, if you use different source control providers between your projects, you must manually control this before a project with another source control provider is opened. Additionally, if you have several instances of Visual Studio running, the last one closed will save its settings to your profile, and when Visual Studio is restarted the settings of the instance last shut down will be used. Thus, if you use more than one source control provider plug-in between projects, it is a good idea to check which source control provider is activated before opening any project.
Opening a new web site
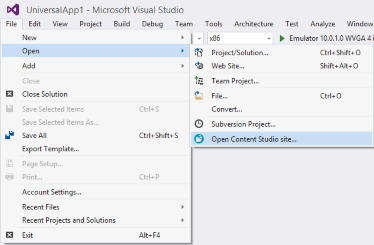
When opening the Content Studio Web site for the first time you must allow Visual Studio to download the site locally so Visual Studio will know about the files used. This is done from the File/Open/Open Content Studio site... menu alternative. The alternative is available only if Content Studio VSI is installed and selected as the current Source Control provider.
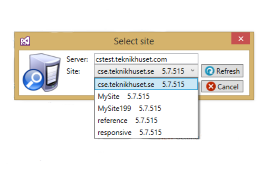
This menu alternative brings up a dialog where you can enter the Web Server name. This name must be known to the DNS, have Content Studio installed and reachable via TCP-IP port 9792. By hitting the Refresh button all available sites will be listed with their names and version numbers. When you have found your site, select it and confirm your choice with the Accept button. Visual Studio will start downloading your site in the background which will take several minutes for a large web site.
Limit the amount of web site data downloaded
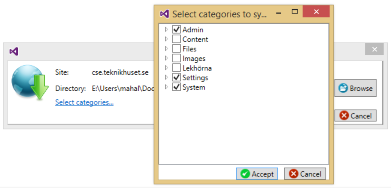
If the site has a lot of documents, the amount of site content (ept and uploaded files and images) can be very large. In that case the download process can be very time consuming. When opening the new site you can select which part of the Web site to download locally. Typically a developer wants to omit uploaded files/images and editorial content (Ept documents) and just work with regular html documents such as edit and presentation templates and code files.
Opening a previously downloaded site
When you have previously worked with a Content Studio Web site you can open it directly from the list of earlier used projects and solutions, which will save you a lot of time. This requires that you previously saved the web site as a part of a local Visual Studio solution.
Remote web sites
When the Web site is located on your local network and Windows Integrated security is effective the security level of your personal Windows account is used to access the web site. When the Web site is out of your network and Integrated Security cannot be used you will be asked to supply user account credentials valid for that web site when the site is opened.
Working with the web site
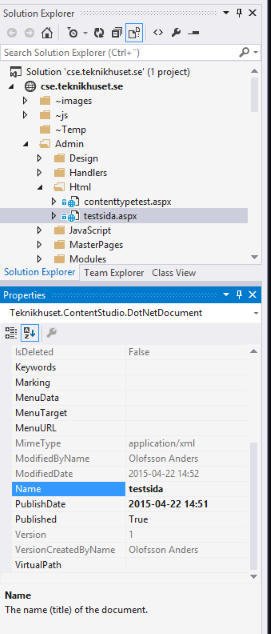
You can find Site documents and folder in the Solution Explorer and properties and settings for each type of object in the Properties window. When you select an item in Solution Explorer the Properties window shows properties on the selected Content Studio document or folder and many of these properties are editable. When you edit a property on a document it will be saved back to Content Studio immediately but most properties will not take effect until the document is approved. Other operations like delete and move operations are carried out immediately as well but does not require the document to be approved first.
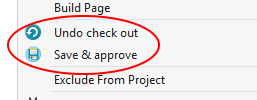
When you open a Content Studio document and start editing it, its content is automatically exclusively checked out and the latest draft content is automatically downloaded to Visual Studio. However, if another person edits the document it cannot be checked out and will be opened in read-only mode. When you make your changes to the document you typically save it locally with the regular file save button in Visual Studio. You can debug and compile the site as any ASP.NET web site and when you are done with your changes you can save them to Content Studio with the Save and approve command available on the document's context menu. To get the latest version of a single document, all documents in a folder or the entire site the command Get latest is available on the Visual Studio Solution Explorer context menu. The Save and approve command is available on folders as well and will perform the action on all unsaved documents in that folder.
Adding items to Content Studio
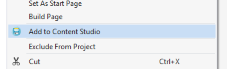
Folders and documents can be added to Content Studio directly from Visual Studio. New Folders will be Units or Categories in Content Studio depending on whether they are added directly below the root level (Unit) or at a lower level (Category). By default all new categories will be of type Text but the DocumentType can be changed in the properties window. By default the folder property AllowedFileTypes is set to .*, which allow any type of document to be created in the folder, but this can (and should) be changed in the properties window as well. When the folder or documents has been created in Visual Studio it must be added to Content Studio and this is done with the Add to Content Studio menu entry. When the item has been added to Content Studio it can be changed and approve back to Content Studio just like an item added through Content Studio itself.
Document types
- Active Scripting
- Contains deprecated legacy Content Studio components. This is an outdated document type, do not use.
- HtmlWithMeta
- Regular .ASPX documents with full body and header. Opens with full visual editor in the classic Content Studio admin interface.
- HtmlWithOutMeta
- Regular .ASPX documents or User-controls (.ASCX) with only content. Use this type for includes and User-controls
- TextWithMetaData
- Like HtmlWithMeta but will open as plain text in the classic Content Studio admin interface.
- Text
- Regular text type documents that opens with a plain-text editor in the classic Content Studio admin interface. Use this type for CSS and Java-script files and alike.
- EPT_EditingTemplate
- Contains forms used to define the schema of the EPT_Document type. Site editors use this type of document on the web site when adding or updating editorial site content. Currently, this type of folders can be added to Content Studio using VSI but not new documents of this type. Documents of this type should be added using the classic Content Studio admin interface since currently there is no way in VSI to connect the editing form to its EPT_Document folder.
- EPT_Presentation
- This type of document is used to visually present the content of an EPT_Document. Documents in this type of category are regular .ASPX pages, will contain a full body and header and opens with full visual editor in the classic Content Studio admin interface. A presentation template contains controls that inserts data from a specific EPT_Document field. It is the equivalent of Views in MVC-based sites. Adding new documents of this type is not fully supported in VSI and should be added using the classic Content Studio admin interface since currently there is no way in VSI to connect the presentation document to its EPT_Document folder.
- EPT_PresentationNoMetaData
- Like the EPT_Presentation but contains only content. Use this type for User-controls and includes. This is the equivalent to Partial views in MVC. Adding new documents of this type is not fully supported in VSI and should be added using the classic Content Studio admin interface. Existing documents can be edited and approved back to Content Studio.
- EPT_Document
- Contains Xml-based editorial content document that are created/updated through an EPT_EditingTemplate and presented through an EPT_Presentation document. This type of folder should be added using the classic Content Studio admin interface since currently there is no way in VSI to connect the presentation to its EPT_EditingTemplate folder or EPT_Presentation. Currently VSI does not support adding new documents of the EPT_Document type but existing documents can be edited and approved.
- File
- Contains uploaded files and images. This type does not support versioning.
Updating site settings and properties
Site settings and item properties are available in the Visual Studio Properties window. The content of this window is context sensitive and changes based on the item selected. To change a site wide setting you select the site root and the site settings will be available in the properties window. As always, the site settings are very sensitive and a mistake here can make the site malfunction.
Limitations
Editing templates
Although you can edit and approve editing templates in Visual Studio, their schemas are not updated which means that they might not work correctly. A developer who has made changes to an Editing template should re-save and re-approve that template in the classical Content Studio admin Web interface.
Presentation templates
You cannot connect or disconnect presentation templates to a category/schema from Visual Studio, this is supported from the classical Content Studio admin Web interface only.
Permissions and security
You cannot manage object permissions or work with user/groups from Visual Studio, this is supported from the classical Content Studio admin Web interface only.
Event actions
You cannot manage Event Actions from Visual Studio, this is supported from the classical Content Studio admin Web interface only.
Document hierarchies
You cannot handle document hierarchies, which is used to create menu structures, from Visual Studio, this is supported from the classical Content Studio admin Web interface only.
Modern editor (aka. CS Edit) lists
You cannot handle Modern editor lists and associated lists from Visual Studio, this is supported from the classical Content Studio admin Web interface only.
Other limitations
Several more limitations exists which only can be performed in the classical Content Studio admin Web interface.
Configurating VSI
There are some settings on the web server that cannot be used as is when debugging the site locally. This might be a connection string to a product database where you want to use a local database to avoid changing any production data. A production site can (and should) be configured with debugging turned off and to display limited "user friendly" error messages. This is not desirable in the development environment where you want to be able to debug the code and see detailed error messages.
To solve this Content Studio uses the Web.config transformations, developed by Microsoft
to use when deploying Web sites directly from Visual Studio. All settings, which must be transformed
to the local computer where debugging and development takes place, are processed when the site is downloaded
or refreshed.
The transformation settings are defined in the file web.vsi.config which
is located in the web server root directory. This file is installed by the Content Studio 5.7 installation
program by default. Unfortunately, earlier versions of Content Studio do not install this file so in order to fully use
Content Studio VSI, an administrator should download the file
here and copy it to the server Web site root directory. Just remember to rename the file by removing the
.xml extension.
During the transformation process settings from the web.config file on the server are
merged together with the applicable settings in the server's web.vsi.config file. This generates a
modified web.config file which is then downloaded to the development computer.
To make changes to the transformation you must edit the server copy of the web.vsi.config file and apply the changes by right clicking the site root in Visual Studio project explorer and select the Source control/Update configuration command.
For more information about web.config transformations see
Web.config Transformation Syntax for Web Project Deployment Using Visual Studio
VSI commands
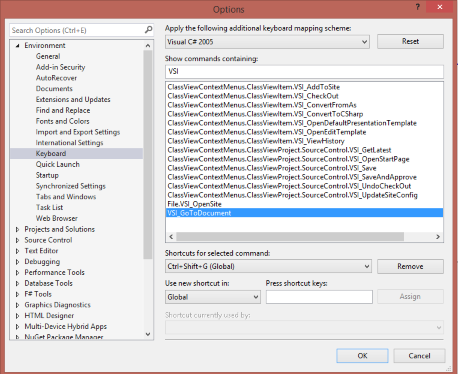
All registered VSI commands are viewable in the keyboard mapping window accessible from the Tools/Options menu option. Not all command are available in the interface as menu options but can be access via keyboard shortcuts.
Available commands
- VSI_AddToSite
- Adds a newly created document or folder to Content Studio.
- VSI_CheckOut
- Checks out a document and prepares it for editing.
- VSI_ConvertFromAs
- Converts old Active Scripting component code to C#.
- VSI_ConvertToCSharp
- Converts Visual Basic code to C# code.
- VSI_OpenDefaultPresentationTemplate
- Opens the default presentation template of the current EPT document.
- VSI_OpenEditTemplate
- Opens the edit template connected to an EPT document.
- VSI_ViewHistory
- Opens a dialog that compares two different versions of the same document.
- VSI_OpenStartPage
- Opens the start page of the site.
- VSI_Save
- Saves document changes. For uploaded files only.
- VSI_SaveAndApprove
- Saves documents changes and approves it by making a new version. Not avaliable for uploaded files.
- VSI_UndoCheckOut
- Checks in a previously checked out document to make it available for another person to edit.
- VSI_UpdateSiteConfig
- Ask Content Studio for changes that cannot directly be edited such as changes to web.config or to the bin directory and applies the changes to the local site. As a part of this process, the web.vsi.config transformation is applied and a new version of the local web.config file is downloaded.
- VSI_OpenSite
- Displays the Open Site dialog
- VSI_GoToDocument
- Displays a small search dialog where you can quick search for a particular document.